Are you the new owner of an e-reader or tablet? Or are you interested in making a nice gift for someone who owns one? I love my Kindle and enjoy reading it but I often don’t bring it places because I’m afraid it will get damaged. Even if you have a nice leather case that opens up like a book, it is not great protection against spills or scratches that might happen when you’re on the go.
Case in point. I carry a small bottle of hand sanitizer in my purse and recently I reached into my purse to grab my keys and smelled something I shouldn’t. The bottle had somehow opened up and oozed little bits all over everything. No problem, really, besides the overwhelming disinfectant smell coming out of my purse, but I was glad I didn’t have anything valuable in there–-like my Kindle!
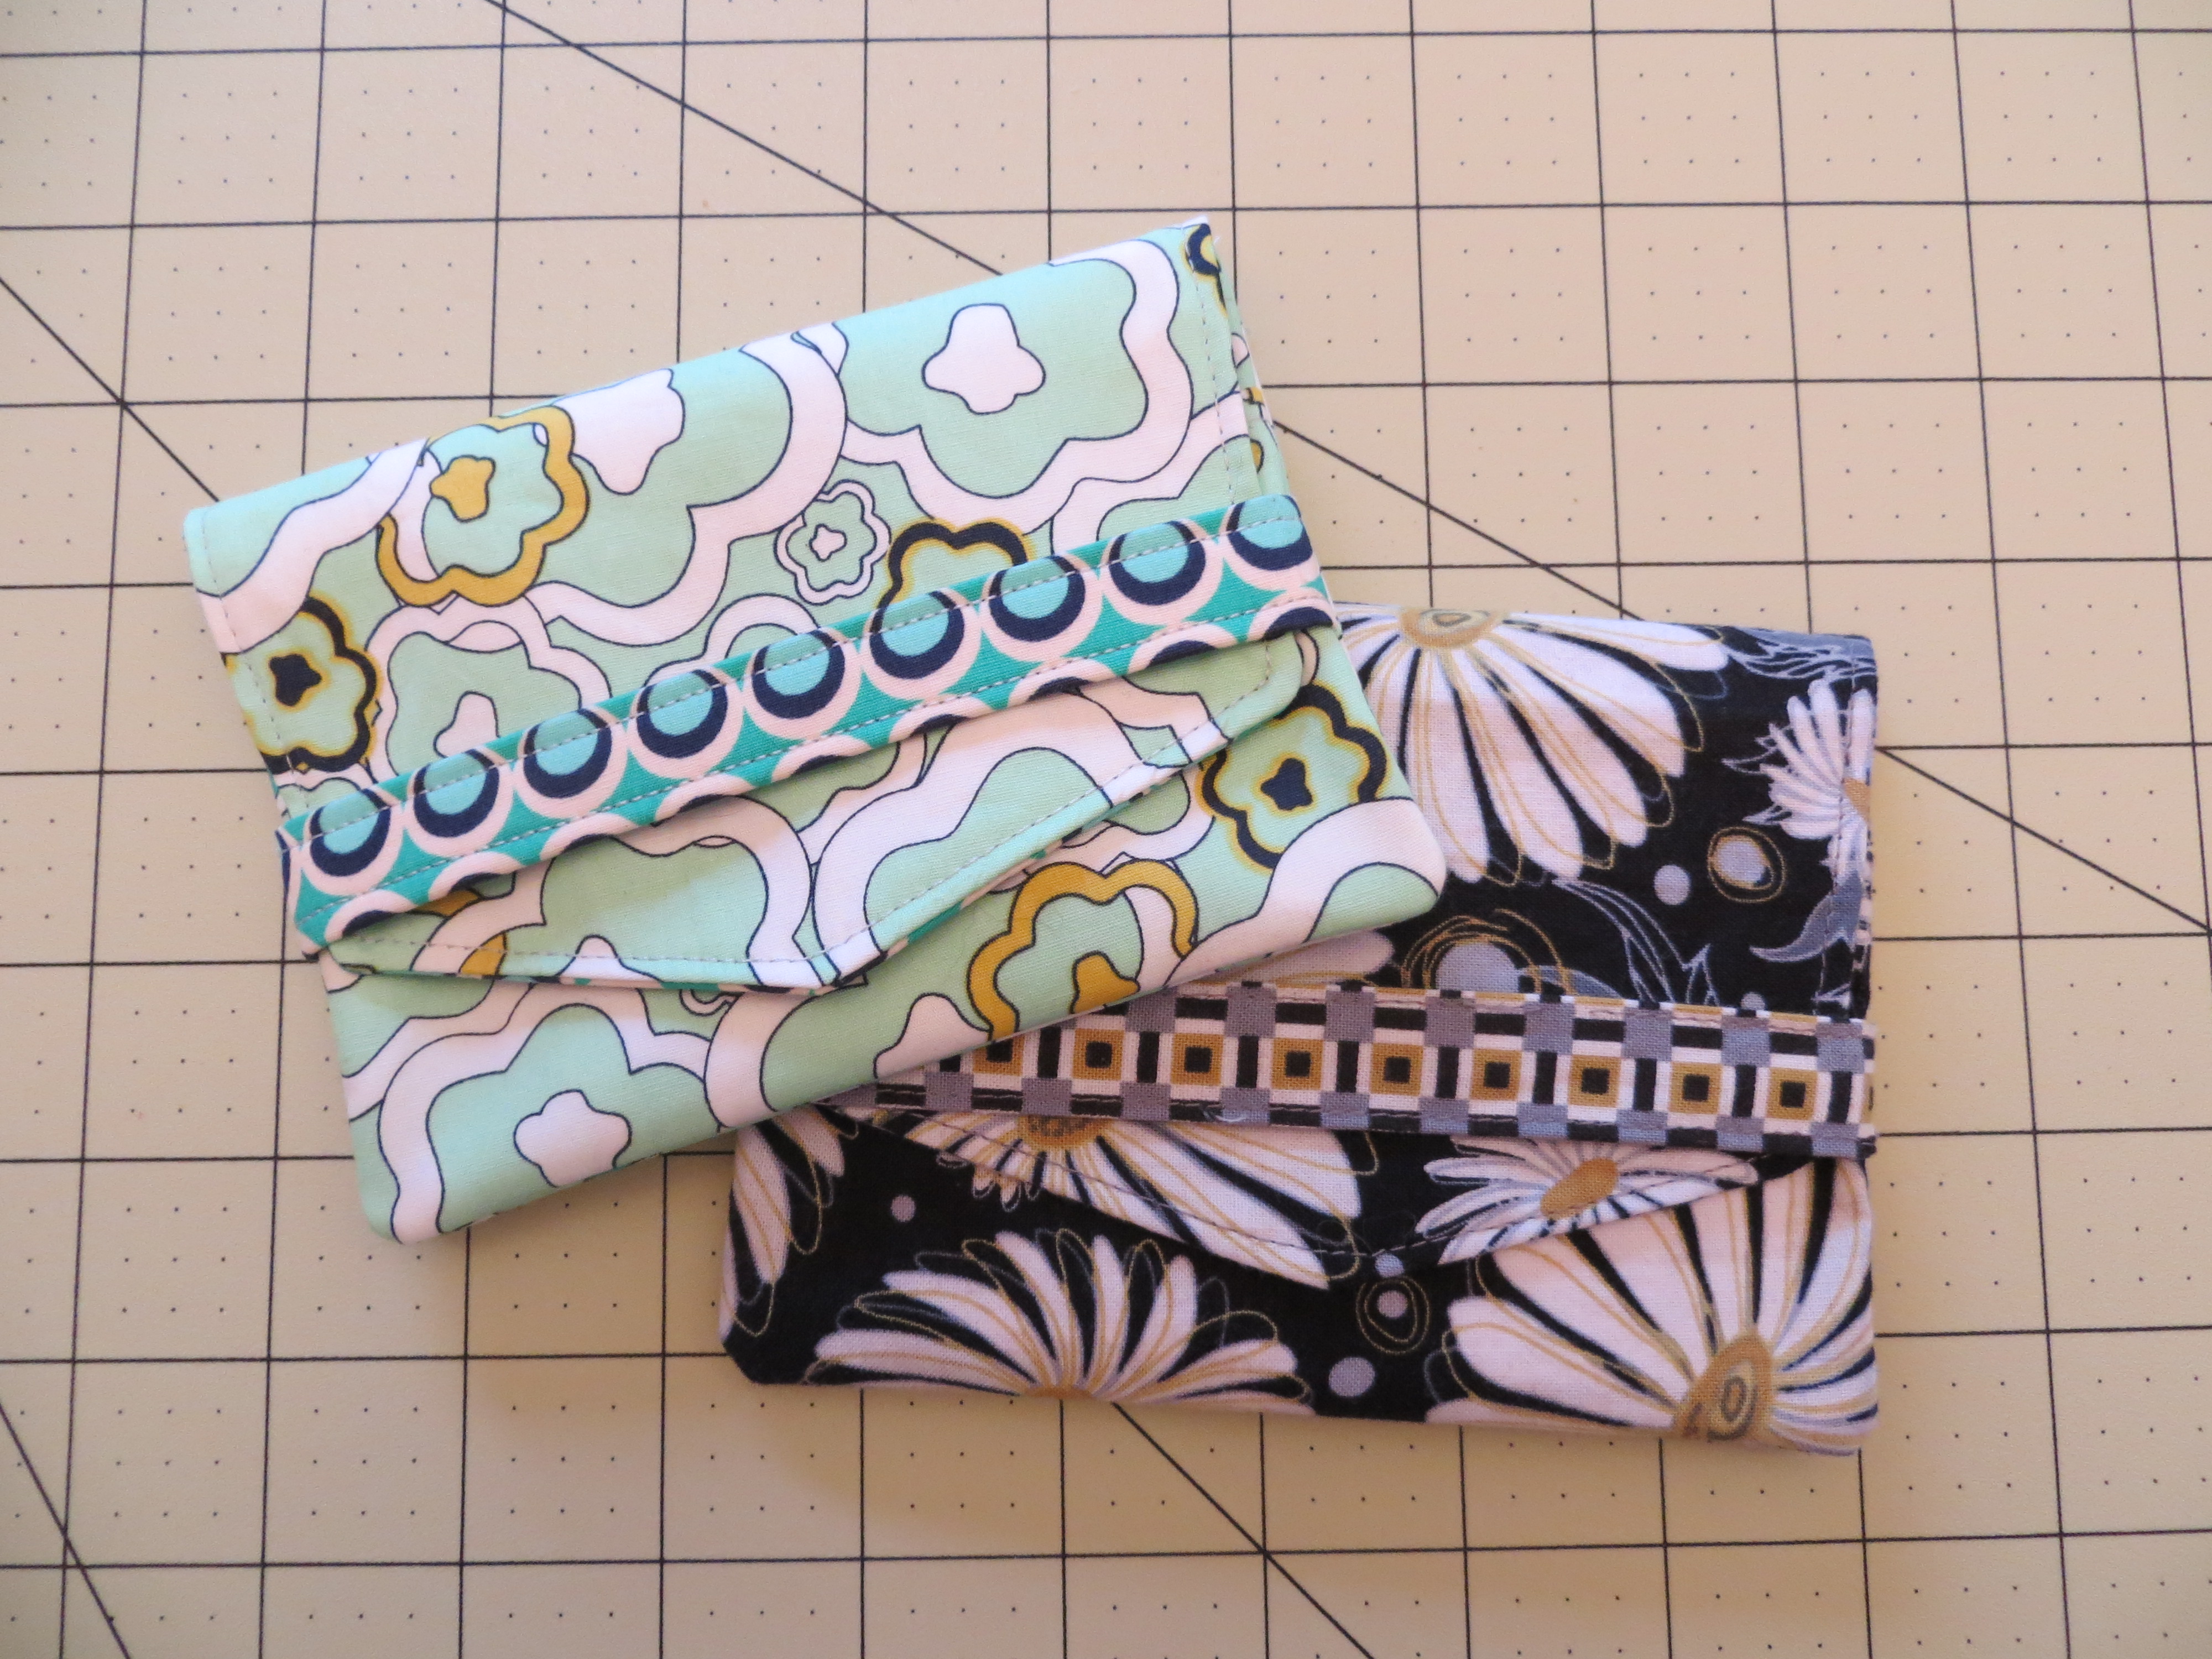
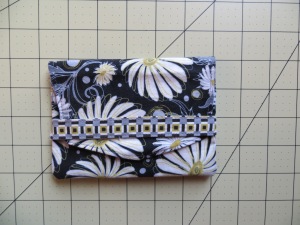
A simple padded case is a quick and easy project. With this tutorial, we’ll walk through installing a zipper, adding a strap and working with the thicker interfacing that provides the protection we’re looking for. Here’s what the case will look like – this one is sewn in another couple of fat quarters from Kate Spain’s Cuzco collection.

Materials
2 fat quarters of fabric, one for the exterior and one for the lining
1 Zipper, probably 10” or less, depending on the size of your e-reader or tablet
1 D-Ring (1/2” on the inside of the flat side)
1 Swivel Snap Hook with a 1/2” wide opening for the strap
Thread and other basic sewing supplies
Your favorite interfacing/interlining
Note on interfacing: If you have a favorite one, go ahead and use it. Just make sure to pick something that offers some decent padding for your e-reader or tablet. If you’re unsure, here are a couple of suggestions:
1. If you want a soft spongy layer of protection: Annie’s Soft and Stable™ is a good option for an easy-to-sew stabilizer that has some cushion–it can be basted to the exterior pieces. When I use Soft and Stable™, I first fuse a woven, fusible interfacing, such as Pellon® SF101, onto the wrong size of the exterior pieces and then baste on the Soft and Stable™.
2. If you want to do it the easiest way: You could iron on fusible fleece to your exterior pieces and use a woven, fusible interfacing on the lining pieces. If you are a beginner, this is a good method to use because it is not as bulky and consequently is easier to sew.
3. Quilt it: Pin lightweight cotton batting to the two exterior pieces and quilt a fun design on it. I would recommend stabilizing the fabric with a woven, fusible interfacing prior to quilting.
4. If you don’t really want a padded feel, but still want protection: Try Pellon® #926 extra firm stabilizer or Lazy Girl’s Stiff Stuff. Lazy Girl’s Stiff Stuff is a little thicker, but both these products give a nice sleek exterior with protection but not a padded look or feel. I treat these products like I do Annie’s Soft and Stable™–first I fuse on a woven fusible to give the fabric more body. Then, I machine baste on the stabilizer so nothing’s sliding around.
All right, enough of the interfacing talk. Let’s get sewing!
Step 1: Measure
Start by measuring your e-reader or tablet. If you are making a case to go over a protective lining or skin, measure the e-reader/tablet in the protective lining or skin.
Add 1-1/2” to the height and 2-1/4” to the width to get cutting measurements for a case that isn’t snug, but fits fairly close to the device. For a little more wiggle room or if you have a thicker tablet, add 1-3/4” to 2″ to the height and 2-1/2” to 2-3/4″ to the width.
In my case, I have a Kindle Keyboard, which measures 7-1/2” H x 5” W, so I will be cutting out pieces 9” H x 7-1/4” W.

Step 2: Cut
Cut out 4 pieces of fabric – 2 for the exterior and 2 for the lining, using the measurements you arrived at in Step 1.
Cut a 1-1/2″ x 3″ rectangle out of the exterior fabric to make the zipper end-stops.
Cut out a 2″ x 14″ rectangle out of the exterior fabric, and subcut into two pieces: a 2″ x 12″ piece for the strap and a 2″ x 2″ for the D-ring tab for the strap.

Step 3: Stabilize pieces
For this tutorial, I am using a woven, fusible interfacing (Pellon® SF101) and Annie’s Soft and Stable™ because I like the additional padding it will provide for an e-reader. Please refer to the discussion above for some other good stabilizer choices.
Cut 4 pieces of woven, fusible interfacing the same size as your exterior and lining pieces and fuse to wrong side of those pieces.
Cut a 2″ x 12″ piece of the woven, fusible interfacing and fuse it onto the wrong side of the strap.
Cut out two pieces of Annie’s Soft and Stable™ in the size of the exterior pieces. Pin and baste these onto the two exterior pieces using a 1/8″ seam, pivoting at the corners with the needle down.
TIP: It’s easier to baste if you have the Soft and Stable™ on top when you are stitching. If you have a walking foot, that helps too, but it isn’t necessary.
The zipper end–stop piece and the strap tab do not need interfacing.
Step 4: Create wrist strap, D-ring tab, and zipper end-stops
You will use the same basic process to create the zipper end-stops, the D-ring tab, and the wrist strap so we’ll do these together.
Fold the 1-1/2″ x 3″ zipper end-stop piece in half so that it is 3/4″ x 3″. Fold the wrist strap in half so that it is 1″ x 12″ . Fold the D-ring tab so that it is 1″ x 2″. Press each piece.
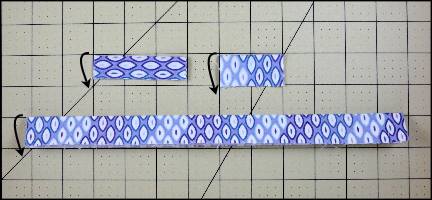
Open up each piece and fold the edges into the center. Press.

Refold each piece along the centerfold and press again. Cut the zipper end-stop piece in half.

Open up the D-ring tab, wrist strap and two zipper stops and cut notches out of the ends to reduce bulk.

Stitch the D-ring tab and wrist strap 1/8″ from each side.

Insert the D-ring onto the D-ring tab and fold the tab in half. Stitch across the tab 1/8″ from the raw edges.

Insert the wrist strap into the swivel snap hook and fold in half with the raw ends aligned. Stitch 1/4″ from the raw edges.

Turn the wrist strap inside out so that the raw edges are on the inside, facing the hardware.

Fold the raw edges toward the hardware and stitch across the width of the strap close to the hardware.

Step 5: Attach end-stops
Open your zipper and stitch across the width of the zipper about a 1/4″ inside the zipper stop.

Cut off the zipper stop. The zipper needs to be 3/4″ shorter than the width of the fabric. Measure and cut off the excess zipper from the other end.
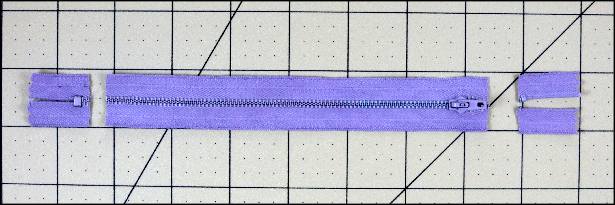
Slip the fabric end-stops over the raw ends of the zipper and stitch across the width, as shown. Trim off the excess fabric even with zipper tape after stitching.

Step 6: Attach zipper to case
Center the zipper on one of the exterior pieces, right sides together (RST), meaning that the zipper pull is facing the exterior fabric.
Align the edge of the zipper tape with the top edge of the fabric and handstitch the zipper to the fabric about 1/8″ from the edge.
TIP: You may be tempted to take the shortcut and baste with your machine. Resist the temptation! If you handbaste, the zipper won’t move out of place on you, and you’ll find it much easier to install . . . do I dare say it’s even fun?

Pin a lining piece with the right side of the lining facing the wrong side of the zipper, as shown below, and stitch 1/4″ from the edge.

TIP: With some plastic zippers, you might not even need a zipper foot with this method. If your machine is like mine, it is a great advantage to use your regular foot because it engages with the feed dogs better so that you are better able to push through the bulky interfacing. Without the regular foot, you may have to coax your machine to get over the end-stop at the beginning–If you have difficulty with the bulk, I would suggest starting about an inch onto the zipper and backstitch to the beginning, then stitch forward to the end.
Fold exterior and lining pieces away from the zipper so that they are facing each other, wrong sides together (WRT). Press.
Topstitch 1/8″ from seam.

Next, you will follow the same steps to attach the exterior and lining to the other side of the zipper tape. Center the other exterior piece to the other half of the zipper tape, RST, and handstitch in place.
Pin the other lining piece with the right side of the lining facing the wrong side of the zipper and stitch 1/4″ from the edge.
Fold exterior and lining pieces away from zipper so that they are facing each other, WRT. Press.
Topstitch 1/8″ from zipper tape. When you are done it will look like this:

Step 7: Attach D-ring tab
Fold the D-ring tab in half with the raw ends aligned and stitch the strap onto one exterior piece 1/4″ down from zipper. It can be attached on the left or the right side, whatever you prefer.
TIP: Make sure to only stitch it to the exterior fabric–-you will need to move the lining out of the way.

Step 8: Stitch exterior and lining
Open the zipper all the way open. Do not skip this step!
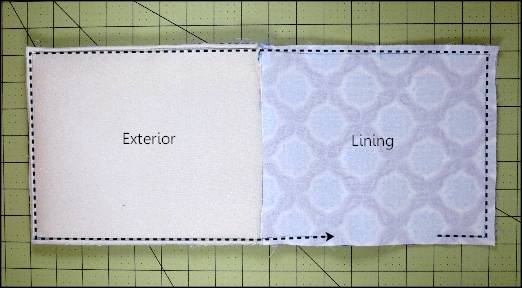
Fold the case so that the two exterior pieces are right sides together (RST) and the two lining pieces are RST. Pin on all sides. The zipper will be between the two layers on the lining side. You will notice that the zipper end-stops do not extend the full width of the case–You will be stitching just to the outside of the zipper end-stops where it is less bulky.
Starting on the lining side, stitch around the entire case with a 3/8″ seam, leaving a 4″ gap on a lining side so that you can turn the case right side out after stitching. Pivot at the corners with the needle down.
TIP: You may wish to make the lining slightly smaller than the exterior so that it fits more snugly inside the exterior. For example, you can stitch the lining with a 3/8″ seam and as you get close to the exterior side of the case gradually bring the seam allowance to a 1/4″ seam. Stitch the exterior side with a 1/4″ seam and move out to a 3/8″ after you cross back to the lining side.
Step 9: Turn case out
Trim the seam allowances and clip the corners. Turn the case right side out through the opening you left in the side of the lining. Use a pencil or other tool to gently push out the corners until they lay square.
Step 10: Finishing
Slipstitch the opening closed and tuck the lining into the case.
Clip the strap onto the D-ring.
Enjoy your new e-reader or tablet case!